How to Make Croissants: A 3-Day Process Walk-Through
Few things are as delicious as melt-in-your-mouth, buttery croissants. Sure they require a little time, but the payoff is worth it.

Few things are as delicious as melt-in-your-mouth, buttery croissants. Sure they require a little time, but the payoff is worth it.
You can make croissants in a marathon session in just one day, but the dough is easier to form if you spread the process over three days. Here’s the three-day breakdown:
Day 1: Make the Croissant Dough and Butter Block.
Day 2: Combine the dough and butter block by rolling or folding the butter block into the dough through a process called lamination. If the dough is properly laminated, you’ll be rewarded with the numerous flaky layers that are the telltale sign of good croissants.
Day 3: Shape the croissants, and allow them to proof or rise for a few hours before baking and enjoying their buttery, flaky goodness.
To ensure your croissants are the best they can be, be sure to read the Tips for Success before getting started.
Tips for Croissant Success
Follow these tips for pastry shop-perfect croissants every time.
BABY THE BUTTER:
- Keep the butter block cool but malleable. Butter that’s too cold will break and tear the dough.
RULES OF ROLLING:
- Use light pressure on the rolling pin. Too much pressure smashes the layers created during folding and turning.
- Keep the edges of the dough as square as possible so that the layers are even throughout.
HEAT IS THE ENEMY:
- Cover dough with plastic and chill anytime you’re not actively working with it.
- Roll, fold, and proof dough in a cool place to prevent the butter from melting into the dough and leaking out during baking, which results in crispy, heavy croissants with “fried” bottoms.
- If the butter seems too soft or squishes from the dough during folding and turning, cover and chill until it’s cool to the touch again.
Day 1: Make the Croissant Dough and Butter Block
Grab our recipe for the Croissant Dough and Butter Block and follow along with the steps below.
Step 1:
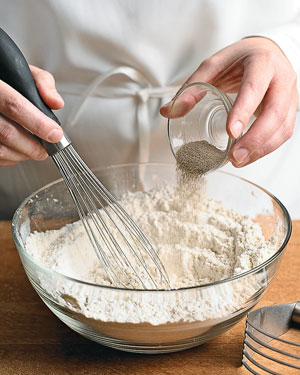 Whisk together flour, sugar, and yeast for the dough in a bowl. Once fully combined, whisk in salt. Cut in 2 Tbsp. butter until sandy; transfer to the bowl of a stand mixer.
You can mix instant yeast directly into the dry ingredients. Other liquids in the recipe will activate it.
Step 2:
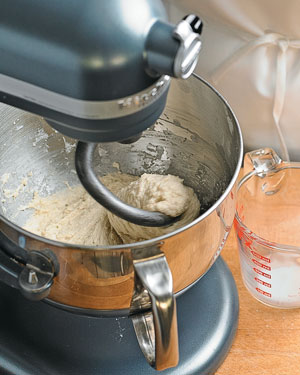 With the mixer fitted with the dough hook and running, add milk and water; mix on medium speed until a dough forms. (If the dough is very wet, turn it onto a lightly floured surface and knead just until it’s only slightly sticky.) Transfer dough to a large bowl, cover with plastic wrap, and refrigerate 2 hours or overnight.
The dough should be slightly sticky after mixing. If it’s very wet, knead it just until workable.
Step 3:
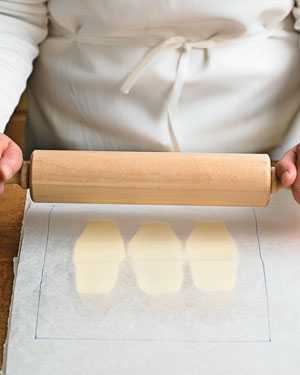 While the dough is chilling, place the 3 sticks of butter side-by-side on a piece of parchment paper. Pound with a rolling pin to soften the butter. (Butter should be malleable but cold.) Sprinkle 2 Tbsp. flour on the butter and top with another piece of parchment. Roll the butter into a 9×11-inch rectangle. Chill until ready to use.
Rolling the butter between 2 pieces of parchment makes it easier to form it into a precise rectangle.
Day 2: Laminate the Dough
Folding and turning the croissant dough with the butter block is so important because it laminates it, forming alternating butter and dough layers. As croissants bake, heat melts the butter layers and produces steam. This creates the many flaky layers that are the signature of good croissants.
After each turn and fold, the dough needs to relax for easier rolling on the next turn, but to keep the butter from melting, the dough must be chilled. Thirty to 45 minutes resting/chilling is ideal. Less rest makes it hard to roll and more chilling leaves the butter too cold to roll.
Step 4:
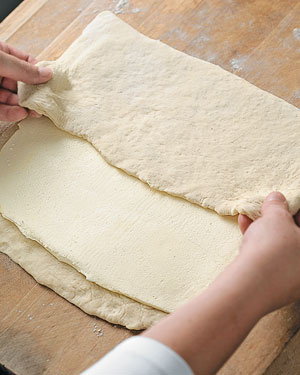
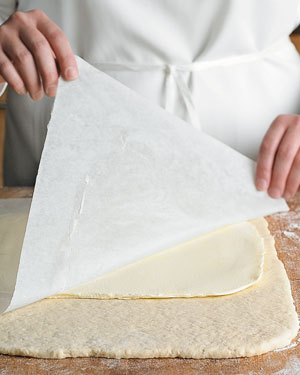 After letting it come to room temperature, roll the dough on a floured surface into a 12×15-inch rectangle. When rolling the dough you may notice that it rolls to the proper dimensions but then shrinks. This means the dough isn’t relaxed enough. Let it sit a few minutes, and then try rolling again. Place the butter block onto the dough so that it covers ⅔ of the dough and leaves at least a ½-inch border on 3 sides. Peel away the parchment paper.
Step 5:
 Fold the top ⅓ of dough over the butter, bringing the top toward you, covering ⅓ of the butter. Brush any excess flour from the dough with a pastry brush to keep the dough from drying out and making the layers brittle. Now, fold the bottom ⅓ of the dough up and over, covering the dough you just folded toward you (this is like folding a business letter). Again, brush any excess flour from the dough. Lightly roll over the dough 2–3 times with a rolling pin to reinforce the seal.
Step 6:
 Rotate the dough so one of the short edges is closest to you. Roll the dough into a 12×15-inch rectangle rolling to, but not over, the edges. Brush away any excess flour and repeat business-letter style fold. This is the first turn of the dough. Cover dough with plastic wrap and chill 30–45 minutes. Remove dough from refrigerator. With a short edge closest to you repeat rolling, business-letter fold, and chilling 2 more times for a total of 3 turns. On the final turn, roll, fold, and cover dough; chill at least 2 hours or preferably overnight.
Day 3: Shape and Roll the Croissants
Rolling and shaping croissants is easiest after the dough rests overnight. This gives the dough time to relax, making it easier to roll to the larger size required. It’ll also be easier to stretch the pieces to the proper length (step 9) before rolling them into the classic crescent (step 10). Don’t manhandle the dough triangles, they’ll tear. Instead, coax the dough longer with light pressure (so you don’t smash the layers or melt the butter with the heat of your hands) running your fingers from the base of the triangle to the tip. You’ll need to stretch it several times.
Step 7:
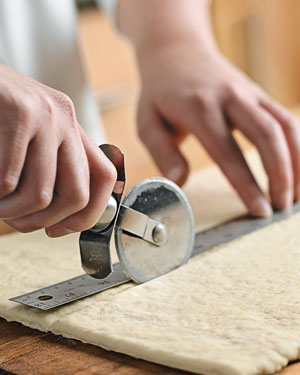 Roll dough into an 11×23-inch rectangle on a lightly floured surface. Cut 2 inches from the right border of the dough. Divide dough in half horizontally. Cut the 2 halves into 3×5-inch rectangles.
Step 8:
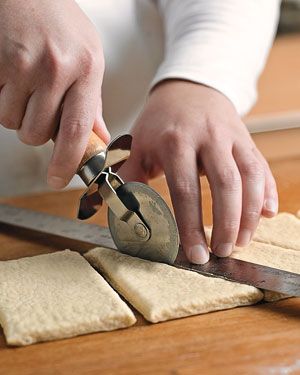 Divide the smaller rectangles into 2 triangles by cutting on the diagonal with a pizza wheel from the lower right corner to the upper left corner. Line 2 baking sheets with parchment paper.
Step 9:
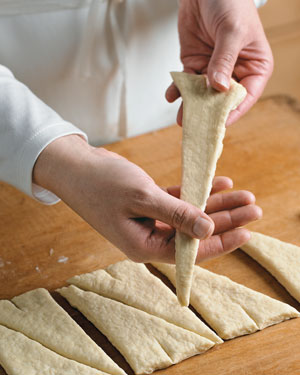 Cut a 1-inch notch in the middle of the base of each triangle. Lightly holding the base of the triangle in 1 hand, gently stretch the triangle from the base to the tip with the other hand so it’s nearly 1½ times its original length (8 inches).
Step 10:
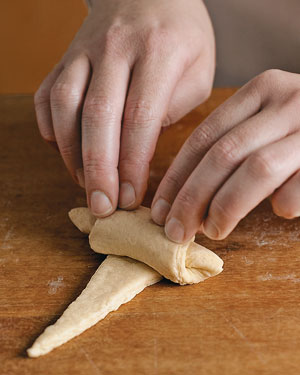 Roll the 2 “legs” created by the notch in the base up and away from each other until you've rolled the croissant to its tip. Place on a prepared baking sheet with the tip end tucked under. Repeat with remaining triangles; space 2 inches apart on baking sheets.
Step 11:
 Combine 1 egg and 1 Tbsp. water in a small bowl; brush onto croissants. Proof until layers are visible and croissants are spongy like marshmallows, about 2 hours. Preheat oven to 400°. Freeze croissants 10 minutes to set butter before baking. Repeat egg wash.
Baking & Freezing Homemade Croissants
Baking Croissants: For the best results, bake only one pan of croissants at a time. Bake croissants until golden brown, 18–22 minutes, rotating pan halfway through baking. Remove croissants from oven; serve slightly warm.
Freezing Croissants: Croissants can be frozen before or after proofing. If you’ll be freezing them before proofing don’t egg wash until thawed. To bake after freezing: Thaw overnight in the refrigerator, egg wash, and bring to room temperature before proofing and baking. You can make an entire batch and freeze them, thawing and proofing only the ones you’ll eat that day.
Ready to get started making croissants? Grab our recipe for the Croissant Dough and Butter Block and start
Product Recommendations
Interested in cooking? Need some supplies?
Check out some of the tools we like. All products featured on Cuisine at Home are independently selected by our editors; we may earn an affiliate commission from qualifying purchases through our links.