The Journey to Pavlova
Want to know what goes into recipe testing? Sometimes, it's 17 tries to get something just right! Here's the journey to pavlova – plus key tips and tricks to making the perfect pavlova every time.
by Amanda McFarlane
When I piped up in an issue-planning staff meeting that pavlova was one of my favorite desserts and was thusly asked if I wanted to develop the recipe for our March/April 2020 issue, little did I know the journey I would go on to perfect it. Here's my story.
What is pavlova?
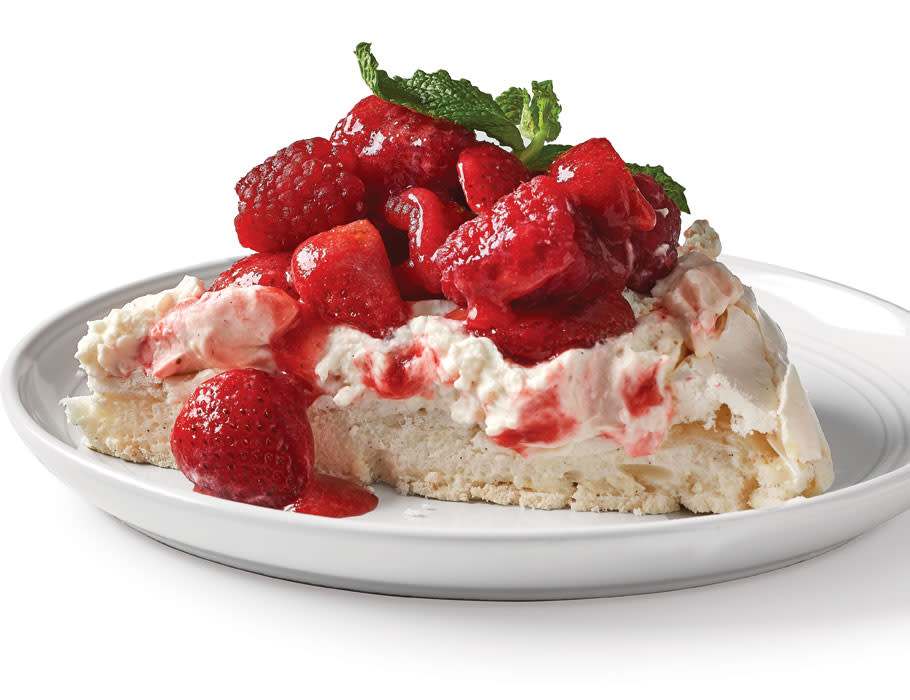
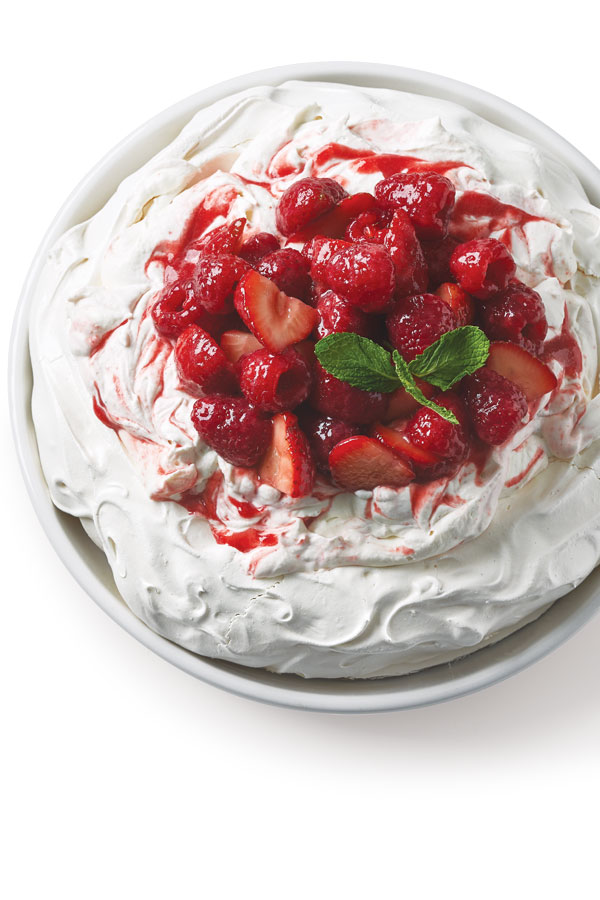
Pavlova is a meringue-based dessert with a crisp, crunchy exterior (bright white please!) and a soft, marshmallowy center. It's typically topped with copious amounts of whipped cream and any number of fruits, like berries, tropical fruits, or even fall fruits like figs or apples.
The origin country of the dessert is hotly debated between New Zealand and Australia, so we won't get into that too much for fear of offending Aussies and Kiwis alike. But what's not debated is that the dessert is named for the Russian ballerina, Anna Pavlova, who captivated audiences across the world with her elegance and beauty. She inspired recipes in many countries, including pavlova.
Meringue
Meringue seems to incite angst and fear in many a baker (or cook, for that matter). But you'd be wrong to fear it. Understanding a few simple principles of meringue and finding a quality recipe for your meringue-based dessert is all you need for meringue success.
Meringue, at its most basic, is whipped egg whites and sugar. The easiest (and best, in my opinion) way to make meringue is with a heavy-duty stand mixer. Less optimal would be a hand mixer. You can, of course, go old-school and whip it by hand like they did before the convenience of stand mixers, but your arms will NOT thank you. However, if you want the true experience of being a baker in the 1800s, feel free to try it by hand. Any mixing bowl will work, aside from plastic; I'd go with either metal or copper, if you want an investment piece. A large balloon whisk will also make this slightly more efficient as it will whip more air into the mixture. Where meringue gets tricky is in the process and the application in which you will use it.
There are three types of basic meringue: Swiss, Italian, and French. Swiss meringue involves heating sugar and egg whites to a specific temperature to dissolve the sugar and stabilize the mixture. Then, it is whipped to the necessary consistency. The benefits of this meringue are its stability and that the sugar has already been dissolved through the heating process, so there's little chance of weeping. Italian meringue is made through making a sugar syrup that is then streamed into whipped egg whites. It is the most stable of the three types of meringue. French meringue is a simple mixture of whipped egg whites and sugar. No heat is applied when making this type of meringue, and it is the least stable of all three types. You can read even more about the three types of meringue in our All About Meringue article.
My Testing Process
Okay, so why did it take me 17 tries to perfect this recipe? Sure, I'd made pavlova before at home (using recipes from the web or cookbooks) — some were more successful than others. My first try was on a hot summer day (rookie mistake) and the dessert was more weepage than pavlova. Note to the world: Don't make pavlova on a humid summer day. My second try was with well-respected baking blogger's recipes using French meringue. It was dry and lacking that soft, gooey interior that makes pavlova so irresistable. My third try was with a heavily-tested recipe from a very well-known food brand. This recipe involved a Swiss meringue, and it came out reminiscent of the first heavenly pavlova I tried that was the basis for all other pavlovas in my mind. I knew what I wanted in my own recipe and set out to work.
I compiled a list of the top pavlova recipes from Google searches and by some of my go-to food websites and recipe writers. The proportions of ingredients and basic directions went into a spreadsheet, where I scrutinized each detail to try to figure out why they used the amount they did. I read up on meringue in general and pavlova specifically. I knew I wanted to use four egg whites vs. the six that some recipes used. Pavlova doesn't hold up well after it's been assembled and topped, so I wanted it to be a manageable size. When you have leftover pavlova, you can do like me and walk it over to your Australian neighbor, who will, most definitely, appreciate it. (I hope you have an Australian neighbor.)
What are the basic components of pavlova?
Egg whites The primary component of pavlova, egg whites can be whipped into etherally light, fluffy clouds. Depending on the amount of sugar used and baking temperature and times, you can have a crisp, dry, crumbly meringue (think meringue cookies) or you can have soft, chewy meringues (think of a texture like a marshmallow).
Sugar Sugar not only sweetens your meringue, but it also stabilizes it and affects the texture. Sugar is hygroscopic, meaning it attracts water. You can increase the sugar for a crisper texture or decrease for a softer texture. Superfine sugar is perfect for making meringues and pavlova as it dissolves more readily in the mixture. Striking the perfect balance for both taste, texture, and stability is key in pavlova.
Acid Acid stabilizes the meringue by encouraging the egg white proteins to coagulate and bond together. Whether you use lemon juice, vinegar, or cream of tartar makes no difference. Some pavlova recipes call for adding the acid at the beginning of the whipping process, and some called for adding it at the end. I saw no major differences in results from my testing, so I opted to add the vinegar I used at the end.
Cornstarch Cornstarch helps keep the pavlova soft and chewy on the inside. But in all reality, the combination of acid and cornstarch is key to achieving this optimal texture. I wouldn't recommend skipping either.
Flavorings While not completely necessary, vanilla is often added to pavlovas for added flavor. I choose vanilla bean paste because who can resist those beautiful black flecks?!
How to Make the Perfect Pavlova
My initial tests involved both French meringue and Swiss meringue – all were failures. I also tested a Cuisine at Home recipe for mini pavlovas, which involves adding a cornstarch-water slurry while whipping the egg whites. It was good, but it didn't quite have the texture that I was looking for in my recipe.
My attempts at pavlova using Swiss meringue were miserable failures – but how is this possible since my go-to recipe that I make at home involves this type of meringue? After four tries, I soon discovered my mistake ... you should heat your egg whites and sugar in the mixing bowl from your stand mixer. I was heating these up in a separate glass bowl, then pouring them into my room-temperature stand mixer bowl, immediately lowering the temperature and making them impossible to whip. Finally, I made a pavlova using this technique and brought it to the taste panel! But it colored too much, turning a light almond color, and the inside wasn't as soft and fluffy as we wanted. Back to the drawing board!
I eventually settled on a French meringue-based pavlova. Why? The texture was just right and it was a beautiful bright white color. But I had another problem to solve. There was some weepage that I wanted to eliminate and the inside didn't appear to be totally cooked. I had to experiment with different oven temperatures and cooking times, plus work on ensuring the sugar was totally dissolved by testing different points at which to add the sugar. A French meringue can be a little tricky because if you add the sugar at the wrong time, the mixture can either turn grainy from undissolved sugar or fail to whip up. However, contrary to what I just said, sugar is also a stabilizer in meringue, and with the quantity added in this pavlova recipe, you really don't have to worry about overwhipping. The key is to ensure the sugar is completely dissolved, so I chose to start adding it when the whites when they were fluffy (not peaking yet) and the whisk started to leave a distinct trail.
The keys to the perfect pavlova are ensuring the sugar is dissolved completely and baking low and slow. This gives the pavlova time to dry out to form a crisp crust, but keeps the inside soft and fluffy. The best part (and one you can spend way too much time on) is forming the shape of the pavlova. Get artistic and let your creativity shine! Just make sure the sides are higher than the center (form a little crater) so you can fill it with tons of the good stuff. I used a large rubber spatula to get the meringue onto my parchment and an offset spatula to spread, form, and make designs.
Bake your pavlova on a parchment-lined baking sheet. The baked and cooled pavlova will be delicate, but you should be able to carefully pick it up and peel off the parchment paper to transfer to your serving plate.
As two of my baking icons say (paraphrased by me):
"The cracks give it character." –Mary Berry
"I quite like when there's a little caramelly weeping." –Dorie Greenspan
Take it from them and me – don't worry about any imperfections; just cover it up with whipped cream.
Grab the recipe for Pavlova with red berry sauce here.
Product Recommendations
Interested in cooking? Need some supplies?
Check out some of the tools we like. All products featured on Cuisine at Home are independently selected by our editors; we may earn an affiliate commission from qualifying purchases through our links.